


Old black & white photos hold a certain beauty and wonder despite their lack of obvious colour. But perhaps it is that sense of wonder that holds a viewer's gaze.
When viewing a photo, the natural inclination is to try to visualize what the people in those images were seeing in front of them.
With colour photography that is not a issue but there is a slight disconnect when it comes to old black & white photographs.
That has not stopped people from trying to bridge that colour gap and allow us to see the myriad tones and hues of yesteryear.
One group of people that attempt to literally shed light on black & white photos exist on Reddit, under the name Colorized History.
The work of the 20 or so approved submitters is fantastic to say the least, bringing old photos to life. But that should not take away from the enormous difficulties involved in carrying out their task - both from a technical and historical perspective.
So how do you colorize a black & white photo and what are the technical challenges invovled?
I spoke to a member of Colorized History, Dana Keller who has earned praise for his colorized images.
His motivation is what one would expect: trying to show us what we would have seen had we been standing behind the lens in the 19th Century and early 20th Century, citing two historical figures whose black & white photos he has worked on.
"Well, when I first began to practice colorizing photos, I chose ones that made me wonder what these pieces of history would look like in real life. For example, what would Abraham Lincoln or the Hindenburg disaster have looked like to the photographer at that moment in time? I think there is an element of detachment that we have from historic black and white images, as if they are only shadows depicting a time too long ago for any of us to truly remember," says Dana.

The 1937 Hindenburg disaster is one moment in history that Dana has colorized
It is not simply a question of choosing colours on a whim. Dana undertakes historical research to attempt to guess which tones people may have been wearing. If all else fails, experience kicks in.
"My goal by adding color is to bring the viewer a little closer to the reality in which these photos were taken. In order to do that, the colors have to be accurate. I do research as much as possible when seeking the proper colors of military uniforms, for example, or the color of a sign or company logo," explains Dana.
"But much of the time, there isn't much to go on, and some educated guessing is required. A lot of trial and error. After some practice though, you begin to recognize the different shades of grey and what their corresponding colors might be. Some colors will simply not work on certain shades of grey, and you begin to be able to interpret that."
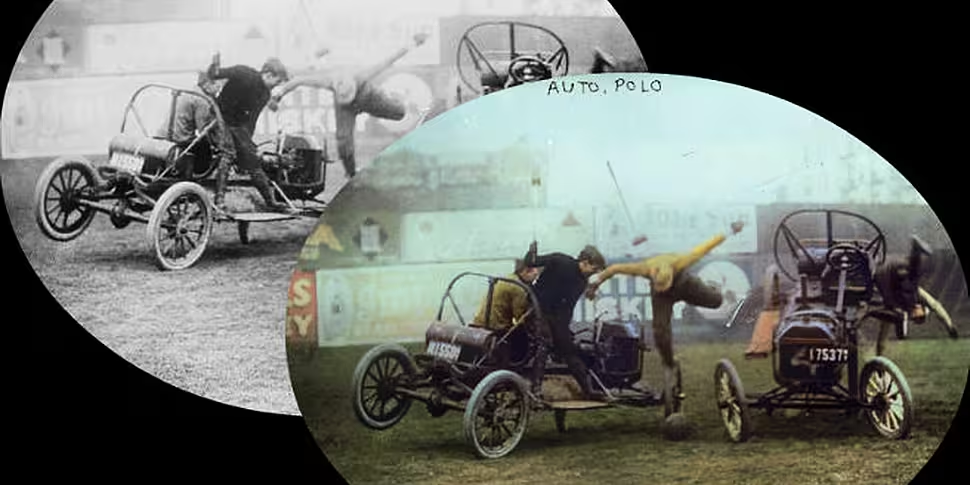
Below is one of Dana's colorized images - one that was very difficult to pull off as it is an action pic. Depicting a type of motorsport known as auto polo that was popular in the US from 1911 to the late 20s, the black & white original is stored at the Library of Congress in Washington DC.
Looking at Dana's colorized version, it is almost impossible to tell that it is an interpretation of a black & white photo.


A convincing interpretation of the original image by Dana Keller. The textures and tones used in the grass and vehicles hardly look like they were once black & white.
To get an idea of how difficult it is to colorize images such as the one above, Dana explains:
"You have to always keep in mind, too, that light interacts with the world in very complex ways. Coloring is not as simple as painting a broad stroke of blue on a person's jacket, or green on a field of grass. There are many many colors in the landscape of a person's skin. Not just the spectrum of reds and browns, but there are elements of blues and greens and purples in the shadows, and in underlying veins visible through translucent skin. The color of the light itself and whether the photo was taken outdoors or indoors, will affect everything as well."
But how does one go about colorizing the image? I spoke to experienced photographer Paul Freeney who is the founder of Photowalk Dublin Tours. He explains how Photoshop can be used to aid the process.
"Adding colour to black and white images is a very rewarding but painstaking process. It is so time consuming that most photographers will give a ball park figure and then charge by the hour. Adding colour to a typical five or six person family portrait will take anywhere between 10 and 20 hours work if it is to be done properly and convincingly," says Paul who (like Dana) is acutely aware that a colorizer has failed in their task if a viewer gets an inkling that coloured inkhas been added.
The reverse is far easier as we can see in this All Ireland hurling final photo by ©INPHO/Morgan Treacy that I edited earlier on. Much photo editing software gives you the option to make a photo black & white with the click of a single button.

"As with most complex operations in Photoshop the process demands using layers. Layers in Photoshop is best described as being like the acetate film used in animation, where the background is one layer and each subject (foreground, furniture, each person gets their own layer).
"It should at this point also be pointed out that each person in the image would typically be seperated into layers. Also, there would be individual layers for a persons hair, skin, eyes, shirt, suit and shoes so that each can be individually coloured. A shortcut could be taken by putting everybodies shoes in an image on one single layer, but it means all shoes will end up the same colour and therefore look false," says Paul.
In terms of colours, there are some clues to work with that may not be apparent to those with limited knowledge of photography and history.
"The fun part of adding colour is the creativity involved, you get to decide the colour of all pieces of clothing, although brighter colours were rare back then and the black and white image will usually offer some hints. A good example being an anchor motif on a child's clothing will point you toward using a navy blue etc. Generally, adults (in images over a century old) would be wearing very muted tones, with bright colours being reserved for children's, particularly little girls' clothes.
"Typical photo studio backdrops always use muted colours in order to keep from clashing or grabbing attention from the subject of an image. If the photograph was originally taken outdoors with trees grass and shrubs in the background, the work is added to substantially. The phrase 'forty shades of green' is far from an exaggeration. The amount of shades of green in an image is almost endless. If while working on a vegetation background, I try to take a shortcut by only using a few shades of green, I will be found out immediately as it will look false."
We all have those very real black & white photos of distant ancestors that seem a world away from the world we live in. But with colorizers, it is possible to bring them closer.


